Preface#
In my previous post, I shared the steps I followed to set up a blog and promised to automate the Cloudflare setup. My goal was to automate as much as possible, minimize manual steps and establish a repeatable process, so I started exploring the use of Infrastructure as Code (IaC) for Cloudflare configuration.
I reached a point where everything is automated except for:
- Domain purchase
- Terraform state storage (Cloudflare R2)
- Linking Cloudflare and GitHub accounts
- Cloudflare access tokens
This is acceptable since these are one-off activities. Now, I can destroy and recreate my Cloudflare setup in just a few seconds.
My tools of choice for this task are Terraform and GitHub Actions. Why? GitHub Actions is a natural choice since I already host my blog on GitHub, and running deployments from my personal machine is a no-go. I am also very far from hitting the limits of the free tier. I chose Terraform because… well, I am familiar with it, and there’s a Cloudflare provider available, so I decided it shouldn’t be hard to get it to work.
The code is available on GitHub under the infra directory.
The latest version of the Cloudflare provider is 5, but due to a bug, I had to use an older version. The bug makes it impossible to set up a Cloudflare Pages project because the source attribute is read-only.
 1
 2
 3
 4
 5
 6
 7
 8
 9
10
11
12
13
14
15
16
17
18
19
20
21
22
23
24
| terraform {
required_providers {
cloudflare = {
source = "cloudflare/cloudflare"
version = "~> 4"
}
}
backend "s3" {
bucket = "simonko-blog-dev-state"
key = "simonko-blog/infra/terraform.tfstate"
region = "auto"
skip_credentials_validation = true
skip_metadata_api_check = true
skip_region_validation = true
skip_requesting_account_id = true
skip_s3_checksum = true
use_path_style = true
}
}
provider "cloudflare" {
# This block configures the Cloudflare provider
}
|
There’s no sensitive or secret information leaking into the configuration file. This setup expects the following variables to be set:
1
2
3
4
| AWS_ACCESS_KEY_ID=<R2 access key id>
AWS_SECRET_ACCESS_KEY=<R2 secret access key>
AWS_ENDPOINT_URL_S3=https://<generated>.r2.cloudflarestorage.com
CLOUDFLARE_API_TOKEN=<access token>
|
API Token Permissions#
When creating the API token, I followed the least-privileged principle. I ended up with these permissions:
| Scope | Item | Permissions |
|---|
| Account | Cloudflare Pages | Edit |
| Zone | DNS Settings | Edit |
| Zone | Zone | Read |
| Zone | DNS | Edit |
The zone is limited to a specific zone only (simonko.dev).
The R2 access token can be generated on the R2 API Tokens page. See this page for more information.
Pages Project#
There are three resource types relevant to setting up the site:
cloudflare_pages_project - used to create the Cloudflare Page, including build, deployment, and Git repository configuration.cloudflare_pages_domain - used to define the domains under which the website is available.cloudflare_record - DNS configuration.
Please note that the names of these resources have slightly changed in version 5 of the Cloudflare Terraform provider (which I couldn’t use at the time of writing this post due to the aforementioned bug).
 1
 2
 3
 4
 5
 6
 7
 8
 9
10
11
12
13
14
15
16
17
18
19
20
21
22
23
24
25
26
27
28
29
30
31
32
33
34
35
36
37
38
39
40
41
42
43
44
45
| data "cloudflare_zone" "zone" {
name = var.domain_name
}
resource "cloudflare_pages_project" "blog" {
account_id = data.cloudflare_zone.zone.account_id
name = "simonko-dev-blog"
production_branch = "main"
build_config {
build_command = "if [ \"$CF_PAGES_BRANCH\" = \"main\" ]; then hugo; else hugo -b $CF_PAGES_URL; fi"
root_dir = "blog"
destination_dir = "public"
build_caching = true
}
deployment_configs {
preview {
environment_variables = {
HUGO_VERSION = "0.145.0"
}
}
production {
environment_variables = {
HUGO_VERSION = "0.145.0"
}
}
}
source {
type = "github"
config {
owner = "SimonKO9"
repo_name = "simonko-dev-blog"
production_branch = "main"
}
}
}
resource "cloudflare_pages_domain" "example_pages_domain" {
for_each = toset([var.domain_name, "www.${var.domain_name}"])
account_id = data.cloudflare_zone.zone.account_id
project_name = cloudflare_pages_project.blog.name
domain = each.value
}
|
In the cloudflare_pages_domain resource, I associate both simonko.dev and www.simonko.dev with my page. This is needed in addition to DNS configuration.
DNS Configuration#
For the website to be accessible, DNS entries must be configured. This can be done in multiple ways. I kept it simple by setting CNAME records for my zone apex (simonko.dev) and www.simonko.dev (for convenience).
Setting a CNAME for the zone apex is possible due to Cloudflare’s CNAME flattening feature. Cloudflare resolves it to an IP.
 1
 2
 3
 4
 5
 6
 7
 8
 9
10
11
12
13
14
15
16
17
| resource "cloudflare_record" "root" {
zone_id = data.cloudflare_zone.zone.zone_id
ttl = 1 # auto
type = "CNAME"
name = "simonko.dev"
content = "simonko-dev-blog.pages.dev"
proxied = true
}
resource "cloudflare_record" "www" {
zone_id = data.cloudflare_zone.zone.zone_id
ttl = 1 # auto
type = "CNAME"
name = "www"
content = "simonko-dev-blog.pages.dev"
proxied = true
}
|
Here’s how the DNS responds:
 1
 2
 3
 4
 5
 6
 7
 8
 9
10
11
12
13
14
15
16
17
18
19
20
21
22
23
24
25
26
| $ dig simonko.dev
; <<>> DiG 9.18.28 <<>> simonko.dev
;; global options: +cmd
;; Got answer:
;; ->>HEADER<<- opcode: QUERY, status: NOERROR, id: 21508
;; flags: qr rd ra; QUERY: 1, ANSWER: 7, AUTHORITY: 0, ADDITIONAL: 1
;; OPT PSEUDOSECTION:
; EDNS: version: 0, flags:; udp: 65494
;; QUESTION SECTION:
;simonko.dev. IN A
;; ANSWER SECTION:
simonko.dev. 38 IN A 104.21.112.1
simonko.dev. 38 IN A 104.21.96.1
simonko.dev. 38 IN A 104.21.32.1
simonko.dev. 38 IN A 104.21.48.1
simonko.dev. 38 IN A 104.21.64.1
simonko.dev. 38 IN A 104.21.80.1
simonko.dev. 38 IN A 104.21.16.1
;; Query time: 0 msec
;; SERVER: 127.0.0.53#53(127.0.0.53) (UDP)
;; WHEN: Tue Apr 22 16:13:05 CEST 2025
;; MSG SIZE rcvd: 152
|
 1
 2
 3
 4
 5
 6
 7
 8
 9
10
11
12
13
14
15
16
17
18
19
20
21
22
23
24
25
26
| $ dig www.simonko.dev
; <<>> DiG 9.18.28 <<>> www.simonko.dev
;; global options: +cmd
;; Got answer:
;; ->>HEADER<<- opcode: QUERY, status: NOERROR, id: 55374
;; flags: qr rd ra; QUERY: 1, ANSWER: 7, AUTHORITY: 0, ADDITIONAL: 1
;; OPT PSEUDOSECTION:
; EDNS: version: 0, flags:; udp: 65494
;; QUESTION SECTION:
;www.simonko.dev. IN A
;; ANSWER SECTION:
www.simonko.dev. 263 IN A 104.21.96.1
www.simonko.dev. 263 IN A 104.21.48.1
www.simonko.dev. 263 IN A 104.21.80.1
www.simonko.dev. 263 IN A 104.21.32.1
www.simonko.dev. 263 IN A 104.21.16.1
www.simonko.dev. 263 IN A 104.21.112.1
www.simonko.dev. 263 IN A 104.21.64.1
;; Query time: 0 msec
;; SERVER: 127.0.0.53#53(127.0.0.53) (UDP)
;; WHEN: Tue Apr 22 16:13:08 CEST 2025
;; MSG SIZE rcvd: 156
|
Part 2: Automating with GitHub Actions#
Setting up a Terraform pipeline is straightforward and involves two steps:
- Configuring the relevant secrets in GitHub
- Defining a pipeline in code
Secret Configuration#
As mentioned earlier, four environment variables must be set for the pipeline to work. I defined a secret for each of these. This can be done by navigating to Repository Settings -> Secrets and variables -> Actions.

Pipeline Definition#
My pipeline is simple and consists of these steps:
- Checkout source code
- Terraform init
- Terraform validate
- Terraform plan
- Terraform apply (only runs on the
main branch)
I used actions/checkout and hashicorp/setup-terraform.
 1
 2
 3
 4
 5
 6
 7
 8
 9
10
11
12
13
14
15
16
17
18
19
20
21
22
23
24
25
26
27
28
29
30
31
32
33
34
35
36
37
38
39
40
41
42
43
44
45
46
47
48
49
50
51
52
53
| name: 'Terraform CI/CD'
on: [push]
jobs:
terraform:
name: 'Terraform'
runs-on: ubuntu-latest
steps:
- name: Checkout Repository
uses: actions/checkout@v4
- name: Setup Terraform
uses: hashicorp/setup-terraform@v3
with:
terraform_version: 1.11.4
- name: Terraform Init
id: init
run: terraform init -input=false -no-color
working-directory: ./infra
env:
AWS_ACCESS_KEY_ID: ${{ secrets.AWS_ACCESS_KEY_ID }}
AWS_SECRET_ACCESS_KEY: ${{ secrets.AWS_SECRET_ACCESS_KEY }}
AWS_ENDPOINT_URL_S3: ${{ secrets.AWS_ENDPOINT_URL_S3 }}
CLOUDFLARE_API_TOKEN: ${{ secrets.CLOUDFLARE_API_TOKEN }}
- name: Terraform Validate
id: validate
run: terraform validate -no-color
working-directory: ./infra
- name: Terraform Plan
id: plan
run: terraform plan -input=false -no-color -out=tfplan
working-directory: ./infra
env:
AWS_ACCESS_KEY_ID: ${{ secrets.AWS_ACCESS_KEY_ID }}
AWS_SECRET_ACCESS_KEY: ${{ secrets.AWS_SECRET_ACCESS_KEY }}
AWS_ENDPOINT_URL_S3: ${{ secrets.AWS_ENDPOINT_URL_S3 }}
CLOUDFLARE_API_TOKEN: ${{ secrets.CLOUDFLARE_API_TOKEN }}
- name: Terraform Apply
id: apply
if: github.ref == 'refs/heads/main' && github.event_name == 'push'
run: terraform apply -input=false -auto-approve -no-color tfplan
working-directory: ./infra
env:
AWS_ACCESS_KEY_ID: ${{ secrets.AWS_ACCESS_KEY_ID }}
AWS_SECRET_ACCESS_KEY: ${{ secrets.AWS_SECRET_ACCESS_KEY }}
AWS_ENDPOINT_URL_S3: ${{ secrets.AWS_ENDPOINT_URL_S3 }}
CLOUDFLARE_API_TOKEN: ${{ secrets.CLOUDFLARE_API_TOKEN }}
|
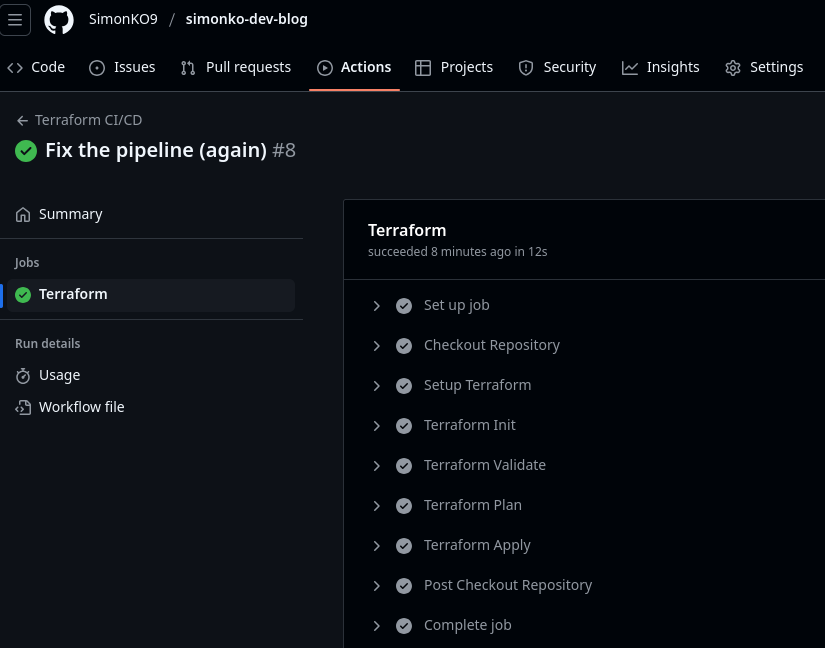
Here’s how a run looks against the main branch:
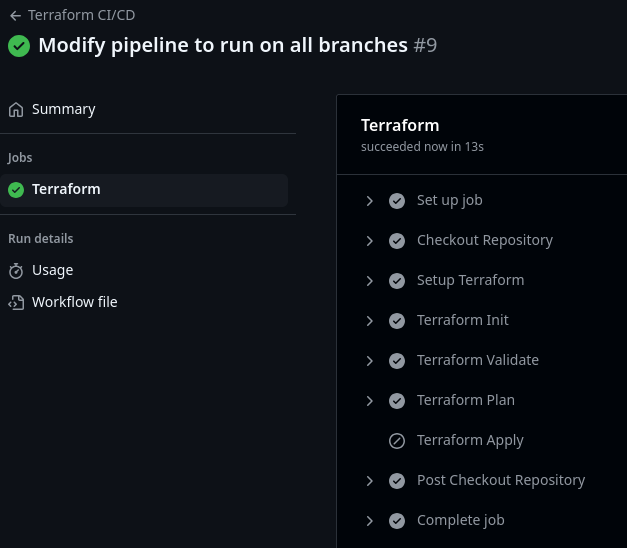
And here’s a run on a feature branch. Note how apply is skipped:
The latest version of my pipeline can be seen here.
Summary#
At this point, my cloud setup is fully automated. While working on this automation, I tore down and recreated everything dozens of times. There is definitely room for improvement. Here are a few ideas:
- Automating the bootstrap setup to a greater extent
- Automatically rotating tokens and syncing them to GitHub
- Defining a whitelist for Cloudflare API Tokens to permit only GitHub Actions IP ranges (see this for reference)
- Integrating tflint, tfsec, format checkers, and other quality/security tools into the Terraform pipeline (which I might cover in a future blog post)
One way to set up the bootstrap project would be:
- Manually creating a Cloudflare API token to manage API tokens.
- Manually creating a GitHub API token to manage secrets.
- Creating automation to generate (or rotate) all needed API tokens and update corresponding entries in GitHub.
- Running this automation manually or as part of the pipeline before Terraform runs. This would require storing another API token for managing API tokens.
For now, this level of automation is sufficient for my personal blog. ;) It has significantly reduced manual effort and made the process reliable, repeatable and secure. And it lets me focus on creating content.
Thanks
Thank you for reading my blog. If you've found this post useful, please consider supporting me. ;)
